Have you been enjoying the NEW Annual Inspirations Idea Book from Close To My Heart®? I have lots of cool, new products to show you, but the one I have been playing around with the most has been the newest Cricut Collection - "Flower Market". I have yet to scratch the surface of this incredible cartridge with over 700 images, but what I have been exploring are the 3-D flowers. There are lots to choose from! I sampled six different flowers so that I could give you a good taste of what you can create - and how you can use them! Of course, you can see a few of the gorgeous variations on the cover of Annual Inspirations:
Awesome! I am going to take you step-by-step through the creation of six flowers - there are going to be a
lot of pictures in this post, so be forewarned! First, let's start with the
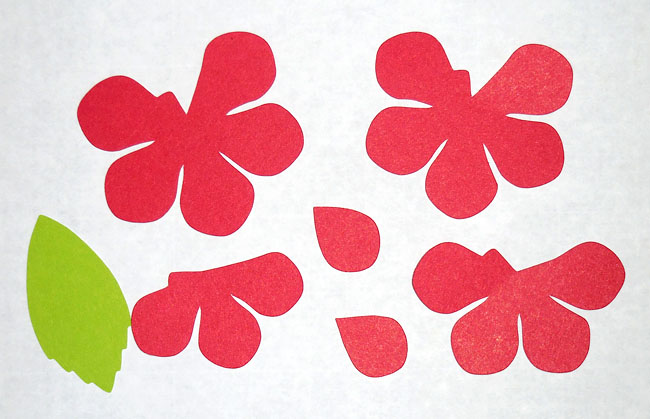
Daisy. The first step, of course, is to cut the pieces. When you select the 3-D flower key of your choice, all of the flower pieces are cut together at once. The same key with the "SHIFT" will give you any accent pieces you will need (stamens, centers, leaves, etc.). Here's what the Daisy key will cut:
For the sake of being able to see the separate pieces more clearly, I inked every other one:
From here, it's just a matter of stacking, rotating and adhering the pieces on top of one another and placing the center (only adhere the pieces in the centers):
After you have done this, turn all of the petals up, so that it more closely resembles a real flower:
So pretty! By the way, set your Cricut for the size that you want your completed flower to be. I used 3" for most of mine. On to the next - the
Daffodil. Here are the pieces:
The piece that looks like a crown is the center of the flower where the stamens come out (that starburst-looking piece). Glue the "crown" piece in a circle end-to-end (I felt that the tube this formed was too tall, so I cut a length of it off the bottom). Fold each of the petals in half lengthwise, and stack fanned-out on top of one another. I ended up using a brad to secure the petals together because they are not perfectly even, so I wanted the ability to move them into place without permanently adhering them (because I am anal that way). Lastly, fold the stamens up:
Now, assemble! I found a glue gun to work best for this. Daffodil complete!
Next, I did the
Pansy. Here are the pieces:
Each of the petals has a slit cut in the base. The object is to kind-of "pinch" the petal and cross the two flaps (formed by the slit) over one another and adhere - like this:
Do this for every petal, then adhere the two center pieces together, offset from one another:
That last little circle you have left is the base that you will adhere your petals to. Start with the five larger petals and adhere the folded bottoms to the base like so:
Do the same for the remaining petals, then adhere the center...well, to the center!
I am loving this! (I did two sizes.) OK - next! Moving up in complexity - the
Rose. Pieces:
Weirdly shaped, right? Well, there's a reason. See how each set of petals has a little notch that extends out on the top-left? Well, you are going to use that notch as the place where you will adhere the petal directly to the right of it. In other words, you will curve the set of petals around so that you can glue the petal on the right to the notch on the left. You will also fold the single petals and the leaf in half lengthwise:
Make sense? Now you will fold or pinch each of the petals outward so that they appear to curve down. In addition, glue the leaf to the bottom-most layer:
The only thing left to do is stack and adhere! Again, I found a glue gun very handy for this - especially those last two single petals:
Oooo - we're on a roll! This next one is a
Succulent - had never heard of it before, but it is my absolute favorite! Here are the pieces:
Wow, there are a lot of pieces...but guess what?! All you need to do is adhere them on top of one another in descending order, in the centers, then fold up all of the petals, like we did with the Daisy - and you're done!
Beautiful!! I added a gold sequin to the center to make it even more beautiful. Inking the edges would have really made it pop!! Ok, I tried one more of the 3-D items, mainly because I was curious how it would go together and turn out. It's a
Cactus, and here are the pieces:
On the outset, it appears that there is no glue involved. Each piece has slits cut into it, allowing you to slide one piece onto another, building it out, according to the little picture in the book. However, when I actually put it together, I found that the base kept folding up, and the whole piece was "side-heavy", and needed something to stabilize it. So, I cut a 1 1/4" circle, and used a glue gun to adhere the base to it. That solved my base-folding problem, but it was still tipping over. SO, I found some little pebbles and glued them into the spaces around the base. This ended up working very nicely. Here is the finished product:
It's adorable, but a little more work than originally anticipated. :-)
Ok, now that we have all of these 3-D flowers, what do we do with them?! Easy! Take your glue gun and go hog-wild on every surface in your home. :-) Here are just a few examples of how I used them:
I could definitely see a picture frame completely covered with these beautiful blooms! I see gorgeous gift ideas for the holiday season (and yes, there are holly and poinsettias)! The "Flower Market" Collection comes with a package Adventure Cardstock, featuring seven NEW colors, three gorgeous stamp sets, and, of course, the Cricut Cartridge:
Order yours straight from
my website and save on shipping! I hope you have as much fun with "Flower Market" as I am!


No comments:
Post a Comment