My apologies for not having posted to this blog for SO long. Sometimes life just takes over and gets away from you. But I wanted to make sure that I shared this new card kit with you, because I enjoyed it so much. I wanted to make sure that you saw it and had the opportunity to get a set of your own! I am sorry for it being last-minute, but you still have 5 more days to order!
What I am talking about is the "From the Heart" Card Kit - September's Special from Close To My Heart. What I liked most about this kit was the E-sized stamp set:
There are so many different options and layers of flowers, leaves and greenery, the possibilities are endless. Just wait and see what beautiful arrangements you can create!
Originally, I was just going to purchase the stamp set (that is an option for $29.95), but when I saw that purchasing the whole kit - stamp set, card bases and envelopes - was only $5 more, that was a no-brainer! So in purchasing the entire kit for 20% off at $34.95, this is what you will get:
All of the card pieces need to be punched out (they are all perforated - it only took a few minutes). After punching out all of the pieces, this is what you will have:
The piece with the gold foil is the card base (top in image above). Then, on the bottom from left to right, you have the thin strip, the card front, and the card insert. The first thing you will have to do is assemble the card base. This is as easy as folding the two outside flaps in, applying adhesive, and closing the front of the base on top of the flaps:
Once the flaps are adhered, you'll want to fold the die-cut front of the base as shown:
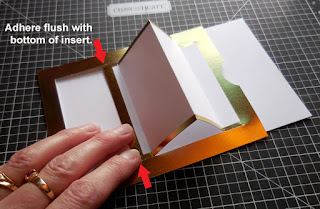
Next, apply adhesive to the underside of the small bottom fold. Take a card insert and slide it into the card base from the notched top. Keeping the insert centered side-to-side in the card base, adhere the small bottom fold of the card base front to the bottom edge of the card insert, keeping the two flush with one another:
Now you will add adhesive to the top side of that same small bottom fold, right on top of the gold foil:
This is where you will adhere the thin strip, keeping it flush with the fold crease and centered side-to-side (the thin strip will extend a little further than the bottom of the card base front):
Congratulations - you have completed your entire interactive card base! I found it easiest to assemble all of the card bases before I went on to the next step. Now comes the FUN part - stamping your card front! As I said - the possibilities are endless. The first one I stamped, I tried to reproduce what was pictured in the full-color instructions that come with the kit. However, after that one, I just made up my own - one design I did multiples of, then in different colors. Here is the first one:
I already stamped the sentiment, but afterward decided that I would leave all of the sentiments until I knew what card I was going to need - that way, if I need a "Thank You" card, I can just pull one of the pre-stamped cards and add the "Thank You" to the front and inside - easy-peasy! So I stamped the remainder of my cards assembly-line style - it went MUCH faster than just doing one at a time!
After all of your card fronts are stamped, it's time to adhere them to the card base. Apply adhesive to the fold just above the thin strip ONLY. The entire card front will not be adhered to the card base. Align the bottom of the card front to the top of the thin strip and adhere:
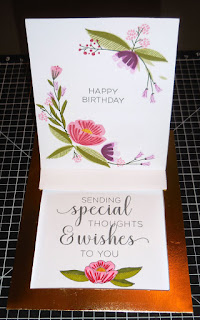
Now when you pull the card insert up from the notched top...
Your inside sentiment (which you can stamp after the card has been assembled) is revealed! Push the insert back down into the card base to "close" the card. Here are the other variations of card fronts that I stamped:
Now whenever I need a card for "Thank You", "Happy Birthday", "Thinking of You", or "Congrats", all I have to do is stamp my sentiment. I had so much fun with these cards - I wish that there were more! But 12 cards should be enough to last me quite some time. I hope you enjoy yours, too!


No comments:
Post a Comment